Demultiplexing
After sequencing your pooled, barcoded library, the uSort-M CLI assigns reads to specific wells, generates per-well consensus sequences, and performs variant calling. The pipeline uses Dorado for barcode demultiplexing with the LevSeq barcode system, minimap2 for reference alignment, and samtools for consensus generation.
Overview
The analysis workflow consists of three main steps:
- Demultiplexing (
usortm demux): Assign reads to wells via LevSeq barcodes, align to references, generate per-well consensus - Hit picking (
usortm pick): Generate cherry-picking lists for Integra ASSIST PLUS robots - Reporting (
usortm report): Generate QC reports, plate maps, and coverage statistics
Pipeline Stages
The usortm demux command runs a multi-stage pipeline:
- Reference alignment: Align reads to your variant library with minimap2 to determine read direction
- Strand splitting: Separate forward and reverse reads (required because LevSeq barcodes NB13–NB96 and RB13–RB96 are reverse complements)
- Forward barcode (FBC) demux: Dorado identifies the forward barcode (96 barcodes = plate columns)
- Reverse barcode (RBC) demux: Dorado identifies the reverse barcode (4 per plate = plate quadrants)
- Well mapping: Combine FBC + RBC assignments to map each read to a 384-well plate position
- Consensus & variant calling: Generate per-well consensus sequences via samtools and identify variants
- Streak-out detection: Screen mixed wells for recoverable minority variants (see below)
Prerequisites
The demux pipeline requires three external tools (see Getting Started for installation):
| Tool | Min Version | Purpose |
|---|---|---|
| dorado | 1.3+ | Barcode demultiplexing |
| minimap2 | 2.20+ | Reference alignment |
| samtools | 1.16+ | BAM processing & consensus |
usortm auto-discovers dorado in common locations (~/Downloads/dorado-*/bin/, ~/.dorado/bin/). You can also set DORADO_PATH, MINIMAP2_PATH, or SAMTOOLS_PATH environment variables.
Input Files
Before running the CLI, ensure you have:
1. Sequencing Data (FASTQ)
Raw sequencing reads in FASTQ format from Plasmidsaurus, ONT, or other long-read platforms:
# Plain or gzipped FASTQ
reads.fastq
reads.fastq.gz
2. Library CSV or Reference FASTA
Provide your variant library for reference alignment and variant calling. You can use either format:
Option A: Library CSV (recommended — auto-converted to reference FASTA):
Name,Sequence
K44A,ATGGCTAAAGGTGCAGAACTGTTTACCGGT...
G45A,ATGGCTAAAGGTGAAGCACTGTTTACCGGT...
WT,ATGGCTAAAGGTGAAGAACTGTTTACCGGT...
Option B: Multi-entry reference FASTA (one entry per variant):
>K44A
ATGGCTAAAGGTGCAGAACTGTTTACCGGT...
>G45A
ATGGCTAAAGGTGAAGCACTGTTTACCGGT...
3. Project Directory
If you created a project with usortm plan, the project directory contains metadata and barcode config:
my_project/
├── usortm_project.json   # Project state and parameters
├── variants.csv          # Variant list
├── mask_config.toml      # Barcode flanking sequences (editable)
├── barcodes/             # Barcode assignments
└── sorting_instructions.md
Running Demultiplexing
Basic Usage
# Using a library CSV (auto-generates reference FASTA)
usortm demux my_project/ --fastq reads.fastq --library-csv variants.csv
Or with a pre-built reference FASTA:
usortm demux my_project/ --fastq reads.fastq --reference reference.fastaOptions
# Custom mask sequences for a different plasmid backbone
usortm demux my_project/ \
  --fastq reads.fastq \
  --library-csv variants.csv \
  --mask-config custom_masks.toml

# Adjust quality thresholds
usortm demux my_project/ \
  --fastq reads.fastq \
  --library-csv variants.csv \
  --min-reads 50 \
  --min-fraction 0.7

# Use multiple CPU cores for faster alignment
usortm demux my_project/ \
  --fastq reads.fastq \
  --library-csv variants.csv \
  --threads 8
See CLI Reference for all available options.
Mask Configuration
The barcode mask (flanking) sequences anchor Dorado's barcode search to a defined location in the read. It accepts two sets of masks corresponding to the forward and reverse barcodes, as shown in the read diagram below.

To provide mask sequences for your vector,
edit mask_config.toml in your project directory (generated by usortm plan)
or pass a custom file with --mask-config. Mask sequences oriented 5' to 3' on the relevant strand,
as shown in the diagram, with Mask 1 sequences using the top strand and Mask 2 using the bottom strand.
# mask_config.toml
[fbc]
mask1_front = "AATATAAATT"
mask1_rear  = "CTGAGATACCTACAGCGTGAGC"
mask2_front = "CAAGTGAGAAATCACCATGAGTGACG"
mask2_rear  = "ATAATTTATA"

[rbc]
mask1_front = "TATAAATTAT"
mask1_rear  = "CGTCACTCATGGTGATTTCTCACTTG"
mask2_front = "GCTCACGCTGTAGGTATCTCAG"
mask2_rear  = "AATTTATATT"

# Optional: override Dorado scoring parameters (rarely needed)
# [scoring]
# max_barcode_penalty = 12
# min_barcode_penalty_dist = 3
# min_flank_score = 0.9
Scoring Parameters
The [scoring] section in mask_config.toml controls Dorado's barcode
classification thresholds. The defaults work well for most experiments. Adjust these only if
you observe low barcode classification rates—for example, lowering min_flank_score
may help with noisy reads, while increasing max_barcode_penalty allows more mismatches.
Output Files
The demux command generates output in project/demux_output/:
demux_output/
├── demux_summary.json     # Per-stage read count funnel
├── well_assignments.csv   # Per-well variant calls
├── read_df.csv            # Per-read barcode + reference assignments
├── well_df.csv            # Per-well summary with consensus & variants
├── plate_map.html         # Interactive Bokeh plate map
├── dorado_config/         # Generated Dorado TOML + FASTA configs
│   ├── levseq_fbc.toml
│   ├── levseq_fbc.fasta
│   ├── levseq_rbc.toml
│   └── levseq_rbc.fasta
├── alignment/             # minimap2 alignment + strand-split FASTQs
├── fbc/                   # Dorado forward barcode demux output
├── rbc/                   # Dorado reverse barcode demux output
├── reference_fasta/       # Per-variant reference FASTAs for consensus
└── streakout/             # Streak-out candidate detection (if found)
    ├── streakout_candidates.csv
    └── well_*.html        # Per-well pileup visualizations
CLI Summary Table
After demultiplexing completes, the CLI displays a per-stage funnel showing how reads progress through the pipeline. Each stage reports both the absolute count and the percentage of input reads:
┌───────────────────────────────────────────┐
│       Demultiplexing Summary              │
├────────────────────┬──────────────────────┤
│ Metric             │                Value │
├────────────────────┼──────────────────────┤
│ Input reads        │            2,400,000 │
│ Aligned            │  2,100,000 (87.5%)   │
│ Demuxed (FBC+RBC)  │  1,850,000 (77.1%)   │
│ Assigned to wells  │  1,650,000 (68.8%)   │
│ Wells with data    │                  725 │
│ Wells ≥100 reads   │                  680 │
└────────────────────┴──────────────────────┘
Demux Summary (demux_summary.json)
Machine-readable per-stage read counts matching the CLI funnel:
{
  "input_reads": 2400000,
  "aligned_reads": 2100000,
  "demuxed_reads": 1850000,
  "assigned_reads": 1650000,
  "wells_with_data": 725,
  "wells_passing": 680
}
Well Assignments (well_assignments.csv)
Per-well variant calls with read depth and consensus quality:
plate,well,reads,variant,consensus_fraction
1,A1,487,K44A,0.95
1,A2,312,G45A,0.88
1,B1,156,WT,0.92
Per-Read Table (read_df.csv)
Detailed per-read assignments including forward barcode (FBC), reverse barcode (RBC), reference name, and mapped well position. Useful for debugging classification rates or building custom analyses.
Per-Well Summary (well_df.csv)
Aggregated well-level statistics including read depth, dominant reference, consensus fraction, CIGAR-based variant calls, and consensus check status.
Generating Reports
Create summary reports from demux results:
usortm report my_project/

# Select specific format
usortm report my_project/ --format html
usortm report my_project/ --format csv
usortm report my_project/ --format json
Output files are saved to project/report/:
| Format | Files | Contents |
|---|---|---|
| HTML | summary.html |
Interactive dashboard with project overview, demux funnel, variant recovery, and read depth statistics |
| CSV | plate_maps.csvfinal_mapping.csvmissing_variants.csv |
Plate maps with well–variant assignments, best-well-per-variant mapping, and list of unrecovered variants |
| JSON | report.json |
Machine-readable report with project parameters, demux summary, variant statistics, and library coverage |
Generating Pick Lists
Create a cherry-picking list for sequence-verified clones:
# Pick one well per unique variant (default)
usortm pick my_project/

# Compact pick list to minimize source plates
usortm pick  my_project/ --compact

# Include C-tier wells in the pick list
usortm pick  my_project/ --tier C

# Target 96-well plates instead of 384
usortm pick my_project/ --target-format 96
By default, the pick list is ordered to match your input library CSV,
so variants appear in the same order you defined them. You may generate a compacted pick plate
by passing --compact, which reorders picks to minimize the number of source plates needed, as
shown in the example below.
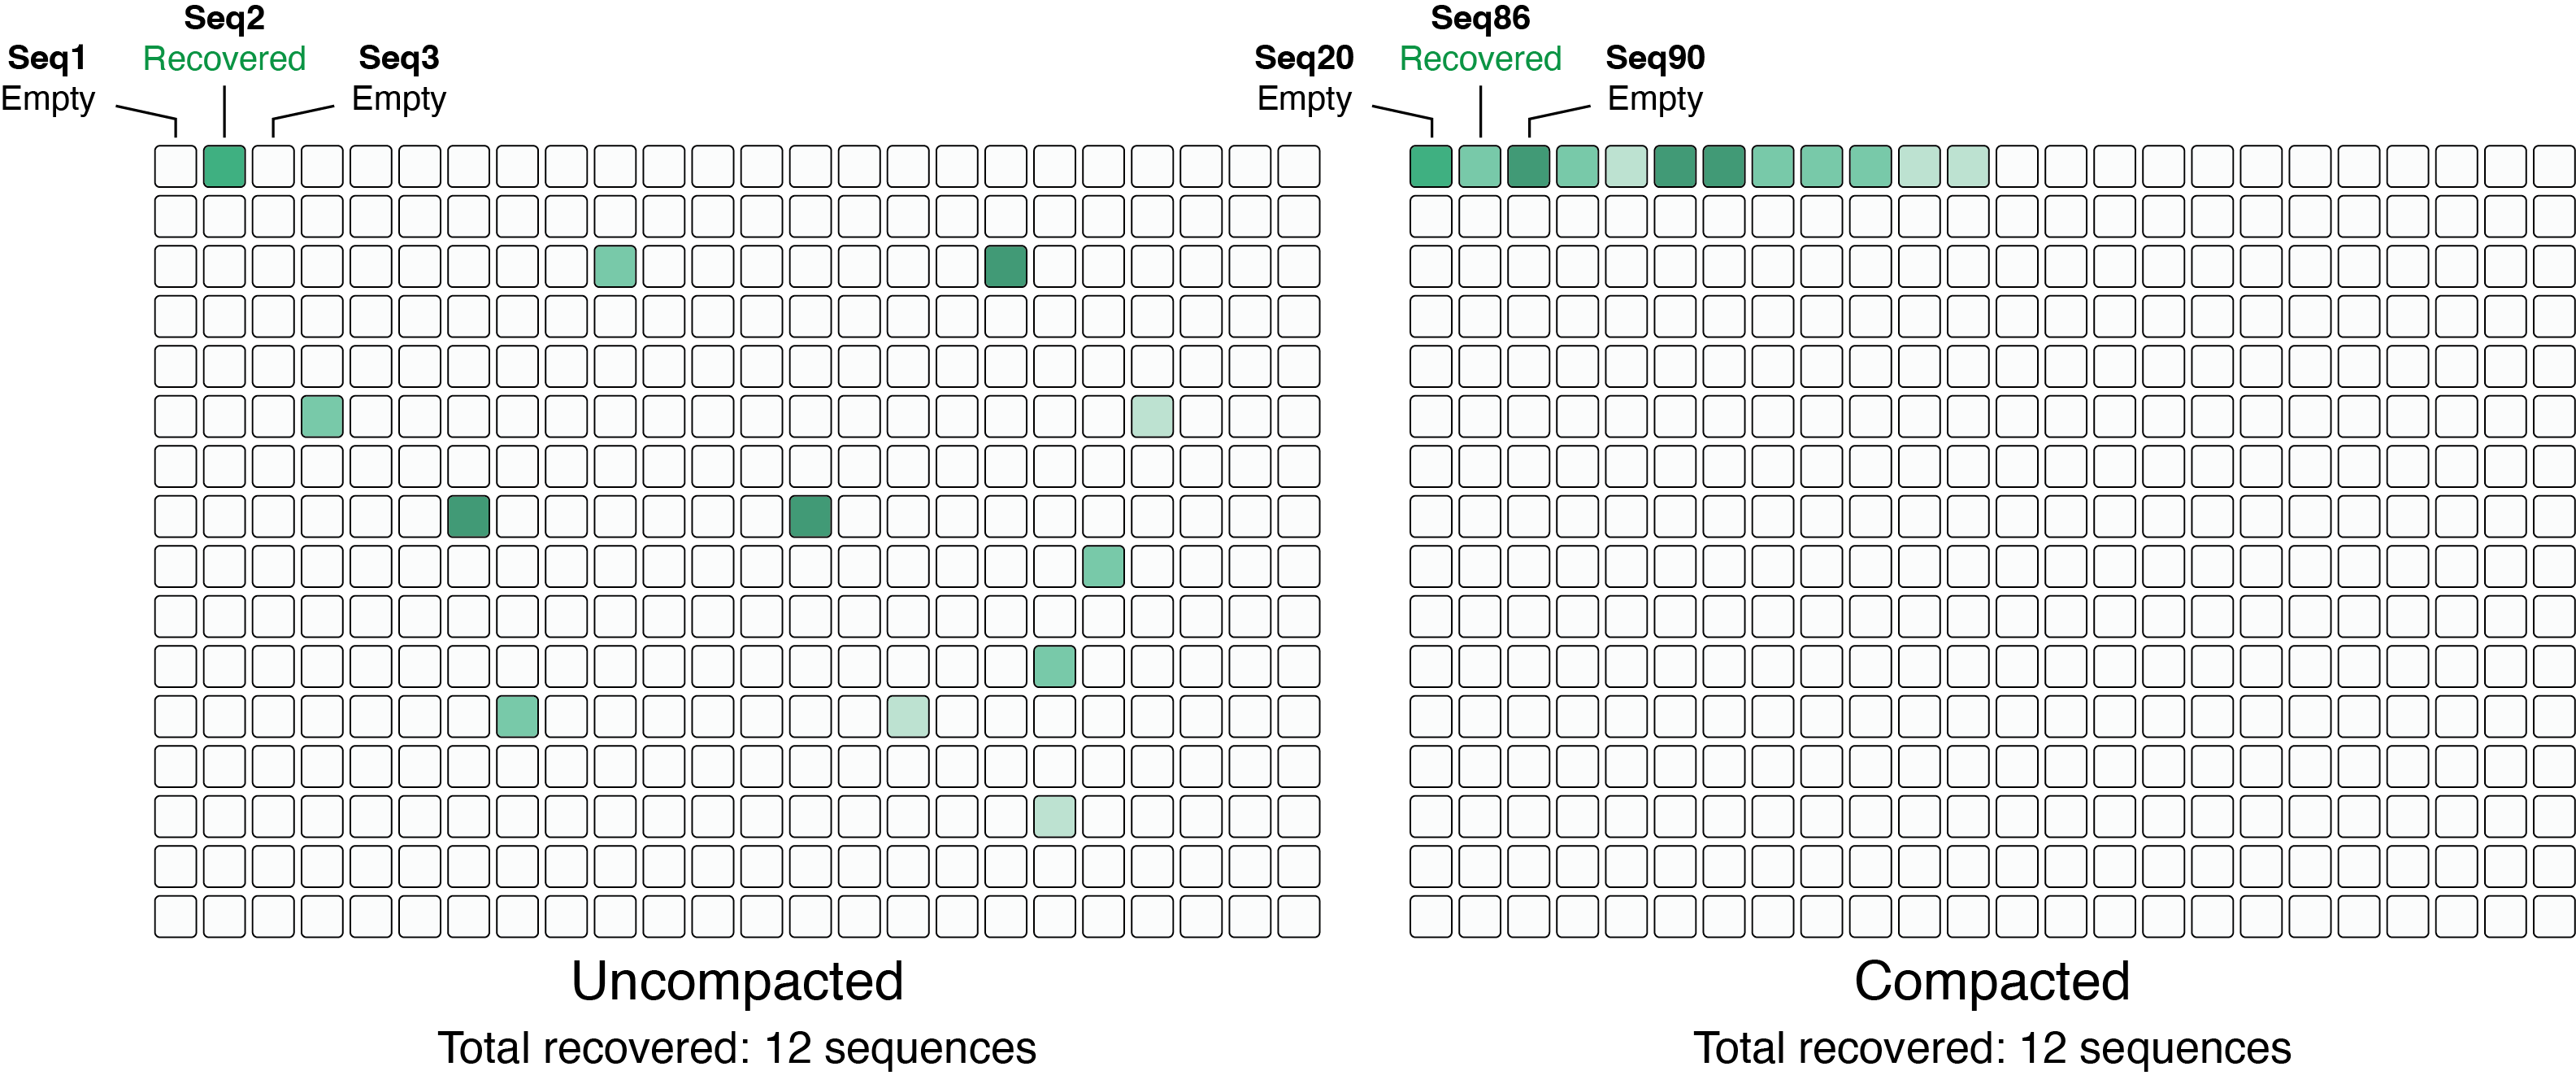
For each variant, the well with the highest read count is selected.
Output format (semicolon-delimited CSV for Integra ASSIST PLUS):
SampleID;SourcePlateID;SourceWell;TargetPlateID;TargetWell;TransferVolume
K44A;1;K23;0;A1;5.0
G45A;1;A11;0;B1;5.0
T203Y;2;C5;0;C1;5.0
Streak-Out Candidate Detection
During demultiplexing, some wells may contain two or more correctly-assembled subpopulations of reads. This occurs when a well captures multiple variants from the library — for example, if two cells were sorted into the same well. If the minority variant was missed during initial sampling (e.g. because the dominant variant was picked), the user can streak out those wells to isolate the minority clone.
The pipeline automatically screens for these wells after variant calling and reports them as streak-out candidates.
Detection Algorithm
For each well where the dominant read fraction is below 90% and the total read depth is at least 50:
- Group reads by reference: Reads are grouped by their assigned
reference variant (strand prefixes
fwd:/rev:are stripped so both orientations count together). - Filter small groups: Groups with fewer than 5 reads are dropped (insufficient for reliable consensus).
- Per-group consensus: For each surviving group, generate a consensus sequence using the same minimap2 → samtools consensus → re-align pipeline used for per-well variant calling.
- Classify consensus: The consensus CIGAR is classified as Perfect Match (exact match to reference), Silent Mutation (nucleotide differences that produce the same protein), or Error.
- Identify candidates: If two or more groups produce a correct consensus (Perfect Match or Silent Mutation), the well is flagged as a streak-out candidate. The minority group(s) with correct consensus are the recoverable variants.
Outputs
When streak-out candidates are found, a streakout/ directory is
created inside demux_output/:
demux_output/streakout/
├── streakout_candidates.csv    # Summary table of candidate wells
├── well_1_A3.html              # Per-well pileup visualization
├── well_1_H12.html
└── ...
streakout_candidates.csv contains one row per candidate well:
plate,well,total_reads,top_frac,n_groups,recoverable_variants
1,A3,47,0.68,2,var_089
2,H12,83,0.76,2,var_012;var_055
Per-Well Pileup HTML
Each candidate well gets a standalone HTML page showing reads grouped by reference. The reference sequence appears as a bold header line, with aligned reads displayed below in monospace. Each base is colored:
- Gray: match (base agrees with reference)
- Red & bold: mismatch (base differs from reference)
- Faded dash: gap/deletion
Groups whose consensus was classified as correct are labeled with a star (★) if they are recoverable minority variants. The pileup pages support horizontal scrolling for long sequences and respect the light/dark theme toggle.
Plate Map Annotation
Streak-out candidate wells are annotated with a blue corner tab in the top-left corner of the well on the demux plate map. This distinguishes them from generic doublets (red triangle in the lower-right), which are wells where the dominant fraction is below 90% but the subpopulations have not been verified to both have correct consensus sequences.
Report Integration
When usortm report is run, a “Streak-Out Candidates”
section appears in summary.html (after the Hit Picking section)
with a table of candidate wells and links to the per-well pileup pages.
Default Parameters
| Parameter | Default | Description |
|---|---|---|
min_well_reads |
50 | Minimum total reads in a well to screen for streak-out |
min_group_reads |
5 | Minimum reads per reference group for consensus |
max_top_frac |
0.9 | Wells with dominant fraction above this are skipped |
Flanking Region Checking
Because long read sequencing is capable of processing very long amplicons,
it is often desirable to amplify from distant priming sites that flank
the variable region, such as a promoter/terminator pair to ensure coverage
of the entire expression cassette. By default, the
demux pipeline only checks the variable sequence region. The
--vector-fasta option enables mismatch detection in the
flanking regions adjacent to the variable sequence.
Automatic Read Orientation
When --vector-fasta is provided, the pipeline also
automatically builds an orientation reference from the
conserved backbone flanking regions. This replaces the default multi-ref
alignment in Stage 1 with a fast single-reference alignment, which is
functionally equivalent to passing --orient-ref manually.
Variant assignment is then deferred to Stage 6 (consensus-based
reassignment), producing identical results with significantly less
alignment time for large libraries.
If you explicitly pass --orient-ref, that reference takes
priority and the auto-generated backbone reference is not used.
When to Use
Use --vector-fasta when your amplicons include encoded tags
adjacent to the variable region and you need to verify those tags are intact.
A correct variable sequence with a broken tag is unusable.
Preparing the Vector FASTA
Create a single-entry FASTA file where the variable region is replaced with
X characters. The sequences before and after the X region are
the 5' and 3' flanking regions, respectively.
>my_vector
...ATTGCTCXXXXXXXXXXXXCTAGATG...
Only one contiguous run of X characters is allowed. The FASTA must contain exactly one entry.
Usage
usortm demux my_project/ -f reads.fastq -r ref.fasta --vector-fasta vector.fastaOutput
When --vector-fasta is provided, the following columns are added
to well_assignments.csv and well_df.csv:
| Column | Description |
|---|---|
flank_check |
Flanking region status: OK, 5' mismatch,
3' mismatch, 5'+3' mismatch, or
No alignment
|
flank_5p_mismatches |
Number of mismatches in the 5' flanking region (in well_df.csv only) |
flank_3p_mismatches |
Number of mismatches in the 3' flanking region (in well_df.csv only) |
The CLI summary will also display a flanking region breakdown after the demultiplexing summary table.
Pick Integration
When flanking data is present, usortm pick excludes wells with
flanking errors by default. Use --include-flank-errors to override:
usortm pick my_project/ --include-flank-errorsRemote Execution
For very large demultiplexing jobs, uSort-M can be used with a remote backend
to run the entire pipeline on a more powerful machine. The usortm remote suite
of commands handles job submission, monitoring, and result fetching over SSH.
Setup
Configure your SSH connection once:
usortm remote config --initThis prompts for host, username, SSH key path, remote job directory, and the path to usortm on the server. View your current settings with:
usortm remote config --showVerify that the remote server has all required tools installed:
usortm remote verifyThis checks for dorado, minimap2, samtools, and usortm on the remote, and reports available disk space.
Submitting a Job
Submit a demux job with the same options as local demux:
# Upload a local FASTQ file
usortm remote demux my_project/ \
  --fastq data.fastq \
  --library-csv variants.csv \
  --workers 15

# Use a FASTQ already on the server
usortm remote demux my_project/ \
  --remote-fastq /data/sequencing/run42.fastq \
  --library-csv variants.csv

# Have the server download from a URL
usortm remote demux my_project/ \
  --fastq-url "https://example.com/run42.fastq.gz" \
  --library-csv variants.csv
Three FASTQ modes are supported:
--fastq— upload a local file (with progress bar)--remote-fastq— path to a file already on the server--fastq-url— URL for the server towgetdirectly (useful when the remote has faster network)
Additional options like --vector-fasta, --mask-config, --threads,
--workers, and --subsample work the same as local demux.
Re-submitting the same project reuses the remote directory and skips uploading files that are already present.
Monitoring
Check job progress and pipeline stage:
# One-time status check
usortm remote status my_project/

# Live auto-refresh until job completes
usortm remote status my_project/ --watch
View the remote log output:
usortm remote log my_project/Fetching Results
Download results once the job completes:
# Metadata only (well assignments, summary, plate map)
usortm remote fetch my_project/

# Include read data for pileup generation during pick
usortm remote fetch my_project/ --read-data
By default, fetch downloads the small metadata files needed for picking and reporting.
Add --read-data to also download read_df.csv and per-variant reference FASTAs,
which are needed to generate per-well pileup visualizations during usortm pick.
Managing Jobs
# List all remote jobs
usortm remote list

# Cancel a running job
usortm remote cancel my_project/

# Clean up old job directories (interactive selection)
usortm remote clean
End-to-End Example
# 1. Configure SSH (one-time)
usortm remote config --init
usortm remote verify

# 2. Submit
usortm remote demux my_project/ \
  --fastq data.fastq \
  --library-csv variants.csv \
  --vector-fasta vector.fasta \
  --mask-config T7_default.toml \
  --workers 15

# 3. Monitor
usortm remote status my_project/ --watch

# 4. Download results
usortm remote fetch my_project/ --read-data

# 5. Continue locally: pick, report
usortm pick my_project/
usortm report my_project/
Quality Control
Expected Metrics
| Metric | Good | Acceptable | Poor |
|---|---|---|---|
| Well assignment rate | >70% | 50-70% | <50% |
| Wells with data | >70% | 50-70% | <50% |
| Mean reads per well | >50 | 20-50 | <20 |
| Variant recovery | >90% | 75-90% | <75% |
Troubleshooting
| Problem | Possible Cause | Solution |
|---|---|---|
| Low assignment rate | Incorrect mask sequences for your backbone | Edit mask_config.toml to match your plasmid flanking regions |
| Few wells with data | Low sequencing depth, PCR failures | Check sequencing QC, re-run with more cycles |
| Uneven read distribution | Pooling bias, amplification artifacts | Normalize inputs before pooling, reduce PCR cycles |
| Low alignment rate | Reference mismatch, wrong library CSV | Verify reference FASTA matches your actual library sequences |
| Multiple variants per well | Contamination, poor FACS gating | Check single-cell mode, use purity gating |
| Low variant recovery | Library skew, insufficient oversampling | Increase fold sampling, check transformation scale |
Complete Workflow Example
# 1. Plan experiment
usortm plan variants.csv --output my_experiment/

# 2. (Optional) Edit mask_config.toml if using a non-cutinase backbone
# vi my_experiment/mask_config.toml

# 3. Perform wet lab steps (assembly, sorting, barcoding, sequencing)
# ...

# 4. Demultiplex sequencing data
usortm demux my_experiment/ \
  --fastq sequencing_data.fastq.gz \
  --library-csv variants.csv \
  --threads 8

# 5. Generate hit-picking list
usortm pick my_experiment/

# 6. Generate comprehensive report
usortm report my_experiment/

# 7. Review report
open my_experiment/report/summary.html
Python API
For programmatic access and custom analysis pipelines, see the Python API documentation.